Blog
How to Navigate Pool Table Installation: Tips and Tricks
Setting up your pool table the right way is important to get the best game. This guide explains the installation process in simple steps. You can do it yourself or ask for help from someone who knows how. Here are the main points you need to know:
- The installation process has a few steps. First, you put together the frame. Next, you place the slate where it should be. After that, you level the table.
- DIY installations can be done if you have the right tools and help from a friend.
- A professional installer is best if you want precise leveling and a smooth playing surface.
- You need to get the room ready for the table. This helps with comfortable gameplay and helps the playing surface stay smooth.
- This guide will show you how to do each step yourself. It also tells you when you should call a professional for help.
What You’ll Need to Get Started (Tools, Equipment, and Preparation)
Before you start the installation process, the first step is to gather the things you need and get your space ready. It is good to read the manufacturer’s instructions, as they give important details for your table. When you have all you need before starting, the job will go much better.
Make sure you have enough space for the table and for people to play around it easily. Check the room size before you start. Clear the area where the table will go. If you do this prep work now, it will help you a lot later. It will make it safer to handle your slate pieces and setting up will go well.
Essential Tools for Pool Table Installation
Having the right equipment for your pool table is very important. This makes sure you set it up the right way. Before you open any boxes, make sure you have all the necessary tools. You can find these in the manufacturer’s instructions. This step helps you avoid delays when you start the assembly process. It also helps you not damage any parts.
Most of the time, to set up a pool table, you need some basic tools. You may have some of these tools in your home. It is a good idea to check what you have first. The tools you often need for a pool table are:
- A socket wrench
- Screwdrivers with a flat head and Phillips tips
- A good spirit level (a carpenter’s level is also helpful)
- Shims that help with leveling
- A paint scraper, which you can use to put wax on slate seams
Getting these things ready before you start helps you go from one step to the next without stopping. A setup that is planned well is the first thing you need to build the table right. Then the table will be ready for many good games.
Preparing Your Room for Pool Table Setup
Choosing the right location and getting your room ready is as important as putting the table together. You have to pick a spot that will fit the table and give you enough clearance all around.
This way, people can have comfortable gameplay and not worry about bumping into walls or furniture. This comprehensive guide shows why the right location and enough space matter for your setup.
Consider these points when you get your space ready:
- Measure for Clearance: You need to have at least five feet of open space all around the table. This will help you move easily when you play.
- Check the Floor: Make sure the floor is level. A floor made of hard wood or concrete is best, so the table does not move as time goes on.
- Choose a Spot: Finding the right location is important. Once the table is set up, it will be hard to move it again, so pick the spot with care.
A good room helps make it safe for everyone and gives you a nice place to play. A level floor is very important. It helps keep the heavy table steady and stops it from moving or tipping over.
Step-by-Step Guide to DIY Pool Table Installation
Are you ready to try an easy pool table assembly on your own? This guide will help by breaking the installation process into manageable steps. You will need some patience and attention to detail to finish this task. If you follow these instructions, you will get a stable and level playing surface for your pool table. The first step is always the most important part: preparation.
Every step matters when you build your own pool table. This is true from putting together the frame to pulling the felt tight. We will help you pick the right spot, keep the slate in place, make the surface level, and add small final parts. Let’s get started so you can build a great centerpiece for your game room.
Step 1: Choosing the Right Location
The first thing you need to do when setting up a pool table is to pick the right location. This is important because once your pool table is put together, it will be hard to move. You should think about the room size and how much space you will need for your cue stick length. This way, you can make sure there is enough space for every shot. Finding the right location with enough space helps you play pool better and feel more comfortable.
When you look at a spot, keep these things in mind:
- Room Size: An 8-foot table should be in a room that is at least 17 feet by 13 feet. This is the minimum room size you need.
- Clearance: Make sure there is five feet of open space all the way around your table. This lets you walk and play without anything in the way.
- Environmental Factors: Do not put your table in direct sunlight. Sun can fade the felt and the wood may get damaged by it over time.
One of the biggest mistakes you can make is not thinking about how much space you need. A small place to play can spoil all the fun. Take some time to measure your space and pick the best spot. It will be worth it in the end.
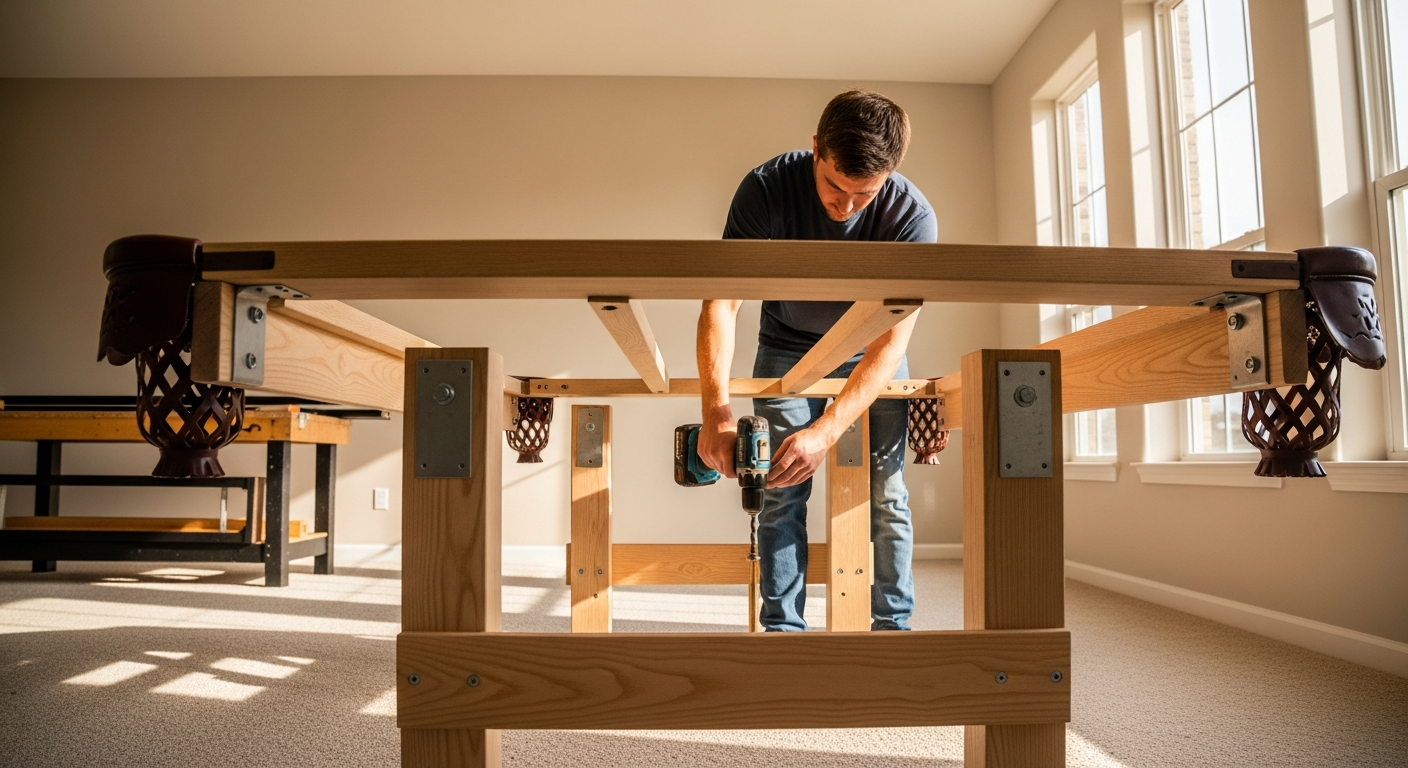
Step 2: Assembling the Frame and Legs
Now that you have set your location, the next thing to do in the assembly process is to build the base of your table. You will usually need to put together the table frame and attach the legs.
Make sure you read and follow the manufacturer’s instructions because the steps can be different with each model. Begin by putting the frame parts, such as the end panels, upside down on a covered floor.
Carefully put on the legs with the hardware that comes with it. Check the height of the legs and make sure the bolts are tight and even. This helps to build a stable base. When the bottom part is safe and steady, get someone to help you turn the frame upright. A shaky frame makes it hard to make things even. So, check every part to be sure it is tight and strong.
Before you go ahead, use your level to see if the frame is mostly flat. You can start with small moves using the leg levelers if your table has these parts. This step helps make everything easier when you do the last, more careful changes later.
For a more detailed walkthrough, see our complete pool table assembly guide.
Step 3: Positioning and Securing the Slate
Now it is time for the hardest and most tiring step. You need to install the heavy slate. Most slate tables have three separate pieces of heavy slate to make the playing surface. These pieces are very heavy. Make sure you have at least one person to help you. Start by placing the center piece on the frame with care.
Next, put the last two slate pieces on both sides of the billiards table. Try to align them as close as you can to make the seams small. After you finish this, go under the table and secure them to the frame. Use the hardware given to bolt the slate pieces down. This will help the installation to be safe and strong.
To make the surface smooth, many people use beeswax or putty. They put this in the gaps between the slate pieces and on top of any screw holes. This helps the ball move straight without bumps. Be sure not to get wax on the frame or where the felt will be attached.
Step 4: Leveling the Pool Table
Getting precise leveling is very important for accurate gameplay. A small slope can make the balls move by themselves. So, you have to be patient and pay close attention when you do this.
If you are new, there are three key factors you need to look at as you level the table. Use a good spirit level or a machinist’s level for the best results. Place the level in the center of the table. Check it both from end to end and side to side.
From there, move the level to different spots across the playing surface. Try the rails and every corner too. If you find a place that is not even, you can use shims. These are thin wood or plastic pieces. Put them between the slate and the frame to make small changes. Some tables have leg levelers too. You can change their height to help with this.
Don’t rush this. Take your time and use extra effort to check the level more than once. Make sure it looks good from every angle. A flat surface shows the setup is done right. It also helps make each game fair.
Step 5: Attaching the Felt, Rails, and Pockets
With the slate nice and level, you can begin putting on the felt. The felt changes the slate and gives you a smooth playing surface. Lay the cloth over the slate. Make sure it is even and in the center. It is important to pull it tight. A tight felt will stop wrinkles or any loose fabric. These can get in the way of ball movement. A smooth playing surface helps you get a good game.
Follow these tips for a clean installation:
- Stretch Tightly: Pull the felt so it is tight while you fix it in place. You can use staples or an adhesive spray to attach it to the wood backing of the slate.
- Work from the Center: Begin to secure the felt in the middle part of each side. Then, move toward the corners to make sure it is stretched out evenly.
After you put the felt on, you can start to attach the rails and pockets. Bolt the rails tightly to the frame. Make sure they are even with the playing surface. Before you tighten all the screws, check if the pockets line up the right way. A mistake many people make is not stretching the felt enough. So, take your time and do it well.
Professional Pool Table Installation in North Carolina
While putting together a pool table by yourself can feel good, sometimes calling a professional installer is the best thing to do. A professional pool table installer has the right experience and the tools for proper installation.
They make sure your pool table will be level, so your first break shot goes well and you get accurate gameplay right from the start. This is very important if you have a complex or fancy pool table.
If you are in North Carolina and need some expert help, Classic Home Billiards is here for you. Our team will take care of the entire installation process. We will save you time and help stop any damage to your investment. Let our experts make sure you get a good setup from the start.
Benefits of Hiring a Pro Installer
Hiring a professional installer gives you peace of mind. You know your table will be set up the right way. A professional installer has done many setups before and knows what problems can come up. They have the right tools to get the job done and use their skills for precise leveling. This is the most difficult step for anyone trying to do it on their own.
Hiring a pro brings several key advantages:
- Expertise: They make sure the playing surface is smooth every time.
- Efficiency: A pro can finish the installation process much faster.
- Damage Prevention: They know how to move heavy slate and handle all parts without damage.
- Guaranteed Quality: You know the job is done right, so you get the best use from your smooth playing surface.
You can set it up by yourself, but hiring a professional installer takes away any guessing and heavy lifting. A professional installer can give you tips on regular maintenance. This will help keep your table in good shape for a long time.
When Should You Consider Professional Help?
Choosing to build a table on your own or getting help from a pro depends on how you feel, what kind of table it is, and what you have to work with. Putting a table together by yourself can help you save some money. But sometimes, you really need a professional. The extra effort of doing it yourself may not be worth it when the table is expensive or tricky to put together.
You should seriously consider hiring a pro if:
- Your table has a hard table design or is an old one.
- You are not comfortable lifting heavy slate pieces.
- You have a table with a larger playing surface, like a 9-foot model.
If you do not have the right tools, time, or help, it is smart to hire an expert. If you need pool table movers in Charlotte, NC, our team can help take apart, move, and set up your pool table. We make sure your table is safe and cared for at every step.
Comparing DIY vs. Professional Installation Costs and Time
When you think about your pool table installation, you need to look at time and cost. DIY installations are good if you want to save money on workers. But you need the right tools and will spend a lot of time. A DIY job for a standard pool table can take two or three times longer than a pro doing it.
Professional services charge a fee. But they give you good results, skills, and a nice playing surface. Below, we will look at the costs and average time you need for each way. This will help you choose what works best for your budget and time.
Average Time Required for Each Method
The time you need to set up a pool table can change a lot based on how you do it and if you have done it before. If you plan to go with diy installations, get ready to spend a big part of your day on this. There are many steps in the process, and you do not want to rush through them. If you hurry, it can lead to mistakes and make playing on the pool table not feel right.
A professional installer can get the job done much faster. The installer knows the installation process well and has special tools. This helps them work fast and still do a good job. The table style matters too. A simple table will take less time to install than one with a lot of decoration.
Here is a simple view of how much time you might spend on each choice:
|
Installation Method |
Average Time Required |
|---|---|
|
DIY (with helper) |
3–6 hours |
|
Professional Installer |
1.5–3 hours |
Doing it yourself can feel good. But you may save a lot of time if you hire a pro. The money you spend could be worth it, especially if you want to play soon.
Cost Breakdown for DIY and Professional Services
The cost for putting together your pool table set is easy to see. If you choose to do it yourself, you mostly pay for the necessary tools you do not have yet. A good level, a socket wrench set, or shims are things you might need. If your toolbox is already full of these tools, you may not need to spend much money at all.
Professional services charge a set price. It can be as low as a few hundred dollars or it might go up to several hundred dollars. The price depends on where you live and the table design you choose.
The fee pays for the work, the skill, and the special tools needed for this job. While you do have to pay this amount upfront, you get the peace of mind that comes with a good installation. This can help you avoid big repair bills later.
If you want to buy pool tables for sale in Charleston, SC or you need help with installation, be ready for an extra cost. Many people feel that paying a bit more for a pro is worth it. You get the peace of mind that your new pool table is put together the right way and it will last for many years.
Frequently Asked Questions
Can I install a pool table on my own, or do I need help?
While you can try DIY installations, pool table assembly needs at least two people because of the heavy slate. The table size and your experience play a big part in the installation process. You might still want a professional installer. A professional installer has the right tools and knows how to get the job done fast and well.
How do I make sure my pool table is perfectly level?
To get precise leveling, take a good spirit level and put it on different spots across the slate pieces. Be sure to check the center, the corners, and along the rails. If you need to fix anything, put shims between the slate and the frame or use leg levelers if your table has them. A smooth playing surface is very important for accurate gameplay. This will help you play your best every time.
Is there a difference between installing an Olhausen pool table and other brands?
Yes, there can be differences. The basic installation process for a pool table is much the same. But some Olhausen pool tables might have their own table design or hardware. It is important to read and follow the manufacturer’s instructions that come with your table. This will help you set up the pool table the right way. It will also protect the playing surface and keep your warranty in place. Comparing top brands? Read our Diamond vs. Brunswick pool table guide.